One Step at a Time
Now that I have an extra quarter acre of land to work this I’m excited about the possibilities. I’ve been planning my new garden in my mind for years, just waiting to have a space with enough sunlight. There are a few things about this new garden space that aren’t perfect. It’s not a level lot and it slopes westward, not a southern slope as gardeners usually want. It’s also covered in saplings, trees and lots of brambles of blackberry, multiflora rose and wild black raspberries. There is also some damage from the first owner, the main one being a driveway area that was cleared and bulldozed so he could drive in to collect wood.

We had a professional tree remover come to take down a few HUGE trees that we didn’t want to deal with. We did cut down a few smaller multi-stem poplars and a few other trees ourselves. We’ve been working on clearing out all the saplings, pulling them with a tool we purchased called the Weed Wrench. I have to admit, it’s a fabulous tool for the job and we’re happy we made the investment in it! We also borrowed a vintage come-along from a friend’s dad. Our friend Shaun came over a few days and lent his muscles to help clear out some of the bigger saplings.


All of this is a lot of work, especially since we’re doing most of it ourselves and by hand. We’ve been spending a few hours each evening clearing out the lot, sawing, digging, raking and carrying all the debris to the compost piles in the back.


Now that a section is cleared I’ve been working on the amending the soil, clearing away all the weeds, brush and picking out all the rocks. I have been able to clear a small area and build a small 4 x 10 ft bed for onions. I used some logs to surround it to help with erosion. I’m currently working on another bed that will be roughly 4 x 15 for potatoes. I’ll keep working my way back towards the house on the top half of the lot. At least I’m able to grow a few crops this year.
 I have to keep telling myself that gardening is about the process not the final product. One step at a time will lead me to a beautiful potager in a few years, I just have to be patient and enjoy the journey!
What stage would you say your garden is in: infancy, teenager, middle age, or mature?
Share this:

Gardening Season is Officially Open
Last Friday I went to my mom’s house and we tilled and planted almost all of her garden. We have a large section of grass still covered with a tarp since we’re doubling the size of her garden again this year. The new section will house all of the warm season crops: corn, tomatoes, peppers, and beans. The current area is going to house all the of the early crops. Here’s a plan of the spring crop area which will become a winter garden after harvesting the spring/early summer crops.

We planted a double wide row of potatoes. It’s 4 ft wide and about 35 ft long. We were able to fit 6 varieties of potatoes in this area, all of which were saved from our own potatoes that we grew last year.
Yukon Gold – (my mom’s favorite) A favorite among gardeners, consumers and chefs. Delicious flesh is drier than most other yellow varieties, perfect for baking and mashing. Yellow flesh appears to be buttered. Bred and selected by AgCanada and the Ontario Ministry of Agriculture and Food in 1966. Excellent yields and a great keeper. 80-90 days.
All Red (a.k.a. Cranberry Red) – Red skin with delicate pale pink flesh. Low starch content makes this variety a good boiling potato for salads or any dish that requires potatoes to retain their shape. Considered the best producing red-fleshed, red-skinned variety. Introduced to SSE members by Robert Lobitz in 1984. Consistently a good producer at Heritage Farm, regardless of the weather conditions. 90-110 days.
Kennebec – (my favorite) Champion late potato! Young tubers are tasty for creaming. Later, good for boiling, mashing, baking—smooth with shallow eyes. Stores well.
Carola – Heavy yields of medium-sized, rounded oval potatoes with straw-beige skin. Excellent when harvested as young new potatoes. Creamy yellow flesh, relatively low starch, great for soups, boiling or fried. Maintains new potato qualities for months in root cellar. 95 days.
La Ratta Fingerling – Long prized by French chefs as a top quality fingerling. We cannot recommend this variety highly enough, an absolute delight to cook with. Long uniform tubers, yellow flesh with firm, waxy texture and a nice nutty flavor, holds together very well. Especially good for potato salad or as a boiled potato. Commands a high price both in the restaurant and fresh market trade. 100-120 days.
French Fingerling – This is a wonderful variety! The rose-colored skin covers its creamy yellow flesh. Very versatile and good for any style of preparation. Peeling is not necessary or recommended. Rumored to have been smuggled to America in a horse’s feedbag in the 1800s. 90-110 days.
I’ll also be planting Purple Viking potatoes in my garden here at Chiot’s Run when I can work up the soil.

We were also able to get four rows of peas planted.
Golden Sweet Snow Pea – (if you remember I planted some of these in planters on my front porch) more than a novelty, this variety produces flat pods that are a beautiful, bright lemon-yellow, great in stir-fries. Tall 6′ vines with purple flowers. Collected from a market in India, rare and tasty. (source: Baker Creek)
Oregon Sugar Pod – Large, thick, 4-5″ pods are superbly tender and delicious. This is my favorite snow pea. Bush plants are high yielding and stay compact. Developed by Dr. James Baggett, of Oregon State University. A winner. (source: Baker Creek)
Little Marvel – Vigorous bush plants, heavy yields and fine-flavored peas. A great home garden variety. An heirloom from 1908. 60 days. (source: Baker Creek)
Wando – This pea was introduced in 1943 and is a great pea for the South, being somewhat heat resistant and can be planted later than most peas. Medium sized peas are great fresh or frozen. An heirloom from 1908. 60 days. (source: Baker Creek)
Green Arrow – 68 days – An excellent garden pea from England. The plants grow 24 to 28 inches tall and have 4 1/2 to 5 inch pods, each stuffed with 8 to 11 petite, deep-green peas. A gourmet variety that has been popular in Europe for years! (source: Sand Hill Preservation)

My mom likes growing onions from sets and she had already purchased 4 different kinds of onion sets, specific cultivars weren’t named on the package. They were simply labeled as: red, white, storage, sweet. We planted roughly 250 onion sets. Some of these will be harvested as green onions and some of them will be left to mature in the garden for bulb onions.

We’re trying to do a little better at planning our garden this year so that when we want to plant winter crops mid-summer we have a large open area ready for them. Last year we had to plant around a few things so it wasn’t as easy to cover as it would have been with better planning. Hopefully all this planning will pay off with a more bountiful harvest of winter vegetables.
How do you plan your garden? Do you plan for multiple season crops from the same space?
Share this:

Quote of the Day: Saint Ignatius
There is nothing simpler, nor more beautiful, than a kitchen garden. It is not enough to cultivate vegetables with care. You have the duty to arrange them according to their colors, and to frame them with flowers, so they appear like a well laid table.”
St. Ignatius (found in Creative Vegetable Gardening)
I have always found traditional rowed vegetable gardens to be quite lovely. There’s just something about those neat straight rows, as if all the vegetables are soldiers in uniform lining up. Spending some of my childhood in rural Ohio, this is the kind of vegetable garden I was exposed to (and the kind we cultivated in our back yard). In these kinds of gardens, the main focus is food production. Little thought is given to the beauty of the plants. That’s what makes these gardens so lovely, they’re utilitarian, yet there’s something so wonderfully beautiful about the orderliness of them.


As I started adding more and more vegetables to my garden I started reading a lot of books about traditional cottage vegetable gardens and European potagers. In these types of gardens often form and beauty were the main goal and vegetables were used to achieve this goal. Now that I have a nice space to put in a large edible garden, I’m trying to decide what kind of garden I’m going to grow. While I love the traditional rural rowed garden, I’m leaning toward a more formal potager with espaliered fruit trees, beech and hawthorne hedges and hopefully a greenhouse. I’m going to dedicate a portion of it as a Winter Potager to bring beauty and vegetables during the cold winter months. This also helps with garden planning, I won’t have to worry as much about when summer crops are harvested, I’ll have dedicated space for winter. That also means that the other other areas can be planted in cover crops for overwintering to help improve the soil.
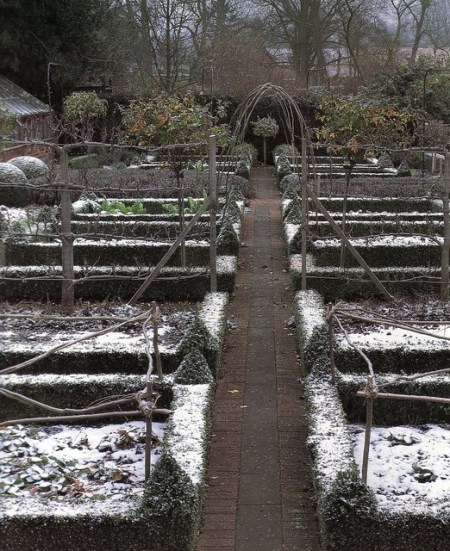
Here’s the photo that I’m going to draw inspiration from for my new garden design. Of course there’s still lots of work to do since the lot is covered in saplings and a few large trees, but hopefully in 5 years my garden will be this lovely. If you want to see a larger size of the image above: click on the image to go to my Flickr.
What kind of vegetable garden do you have? What kind do you dream of having?
Books I’m referencing for design ideas and for incorporating permaculture elements in my garden:
Gaia’s Garden, Second Edition: A Guide To Home-Scale Permaculture
Cottage Garden (DK Living)
Creative Vegetable Gardening
Designing the New Kitchen Garden: An American Potager Handbook
Smith & Hawken Garden Structures
The Wild Garden: Expanded Edition
Fences and Hedges: And Other Garden Dividers (Step-By-Step Project Workbook)
Share this:

Garden Structures: Paths and Walkways
Paths and walkways are important in our gardens. Most of them emerge naturally as we move about the gardens and help direct us to our destinations. They can be straight or meandering depending on the focus and the garden. At times they’re straight because it’s most efficient, sometimes they curve naturally because we must skirt a steep slope.


Some areas in our garden deserve dedicated pathways others do not. The destination of the walkway or path will also determine it’s width, if it’s a path that you roll down with a wheelbarrow you’ll need it to be wider than path that only gets foot traffic. Think of your garden walkways as the road system or infrastructure of your garden. There are big multi-lane highways, regular two lane roads, small one lane country roads and bike or walking trails. The destination and use of the garden path will determine how wide to make it and what materials it should be paved with.


How can you determine where your paths and walkways should be? I’m sure there are all kinds of thoughts on this. I perfer to let a garden evolve naturally. Your garden is a process not a destination. Live in your garden for a few years and the natural paths and walkways will emerge. You’ll notice areas where the lawn is worn away by foot traffic. When you let your paths evolve organically, they’ll seem natural and established. You won’t regret adding a curve here or not adding on there. You paths will be installed along already established natural traffic patterns in your garden.

Like all other garden structures, paths and walkways can be made of just about any material. From beautiful Kentucky bluestone (one of my personal favorites) to pine needles raked from the nearby forrest floor. Some elements look more natural than others and your overall garden style will determine which ones look best. The destination of the path will also determine what the path is made of. A beautifully bluestone walkways all the way to the compost pile out back would be outrageous and a waste of money, but it would be a beautiful focal point paving the walkway to the front door. Simple natural mulch would be best suited for the path to the compost pile.


The material you choose for paving will also change the feel of the journey. Walking on soft quiet pine needles is completely different than walking on a crunchy gravel walkway. The pathway surface can also decide the speed at which you can travel. Paths paved in large uneven rocks make you walk more slowly than a concrete walkway. Take all of these things into consideration when choosing materials.

I haven’t laid out many specified walkways in my garden, but I’m getting ready to spend some time defining them. Throughout the nine years we’ve lived here, paths and walkways have naturally emerged as we have established the best ways to get to and from specific areas and features of the garden. There’s a clearly defined a path worn in the grass because we always take the same route we go to the compost pile. We have another one that weaves through the side garden as we go from the front yard to the rain barrels. We also one that cuts across the front yard, and one that goes from the side garden to the back of the lot. Even our pets use the pathways in our gardens.

I have established small pathways that weave through the garden beds to spigots and to allow entry to the back of very deep foundation plantings. These paths are simply large flat rocks placed throughout the beds. Some are laid out in a straight path, others are randomly scattered so I can step from one another to avoid stepping on the soil.
")
As with most garden features, I’m partial to using natural elements. I like a nice stone walkway. As I’ve mentioned before, we have plenty of stone in our gardens, so we make good use of this resource by using it for many projects. I have built a few small paths through the flower beds to the outdoor spigots using flat rocks. Our main pathways will hopefully be paved with stones like this one from the National Gardens in Washington D.C.
Do you have dedicated paths and walkways in your garden that you have paved with something? What’s your favorite walkway material?
Share this:

Structural Elements: Arbors, Trellises and Pergolas
Arbors, trellises, and pergolas add great structure to the garden because they add a vertical element that is often lacking, especially in vegetables gardens. They are especially helpful in the winter garden when covered in dormant vines, or when cleaned of plant material and simply left to preserve the garden’s shape while the plants take a long winter nap.


Arbors and trellis help train plants by providing support for vines and climbers. They help keep these plants within their boundaries, which can be important for vines that like to ramble far and wide. We can use them to keep the clematis climbing the porch post, keep the cucumbers up off the ground, or to support the weight of juicy red tomatoes.


Since they allow us to grow upward, they allow for better use of space, particularly in small gardens. A tomato takes up much less space if trained up a support than if left to sprawl along the ground.

As with all garden features, arbors and trellises can be made of a wide variety of materials from crisp wood painted white, to saplings cleared from another part of the garden. They also come in all shapes and sizes from grand structures spanning hundreds of feet, a few stick of bamboo thrust into the garden to support a few peas.


I love arbors and trellises. Perhaps it’s because I have a fondness for flowering vines, or maybe I just love the beauty they add to the garden. Sadly I have no arbors in my garden and only one trellis. A couple years ago Mr Chiots built me this nice large cedar trellis on our garage wall. It’s planted with hops and clematis and occasionally a few sweet peas. I don’t have a photo of it, but you can see it here behind the hydrangeas and here’s a young clematis vine that’s growing on it.


I have a particulary fondness for arbors and trellises made of found materials like saplings and small trees. I was especially impressed by these when I visited the vegetable garden at Monticello.


I’m hoping that I can build a few small trellises for my garden this summer. They won’t be anything grand, although I do dream of having a nice arbor over my garage door draped in grape vines and a few beautiful old fashioned climbing roses scampering up my front porch posts. Vertical elements is something I need to work on my garden! If I had to choose a favorite climbing plant it would probably be the hydrangea vine. I have a few starts I got from my mom’s neighbor this past year, they take a while to get established but I can’t wait!
Do you have arbors and trellises in your garden? What’s your favorite climbing plant?

